Adobe Photoshop is a powerful tool for graphic design. It offers endless possibilities for creativity.
Graphic designers use Adobe Photoshop to create stunning visuals. From photo editing to digital art, it has everything you need. Whether you are a beginner or a pro, Photoshop can help you bring your ideas to life. This program provides tools for retouching photos, designing logos, and crafting intricate illustrations.
It’s versatile and user-friendly, making it a favorite among designers. Dive into the world of Adobe Photoshop graphic design and discover how it can enhance your creative projects.
You May Also Like:

Photoshop Basics
Adobe Photoshop is a powerful tool for graphic design. It offers many features for beginners and professionals. Understanding the basics helps in creating stunning graphics. This guide will explore the Photoshop interface and essential tools.
Interface tour
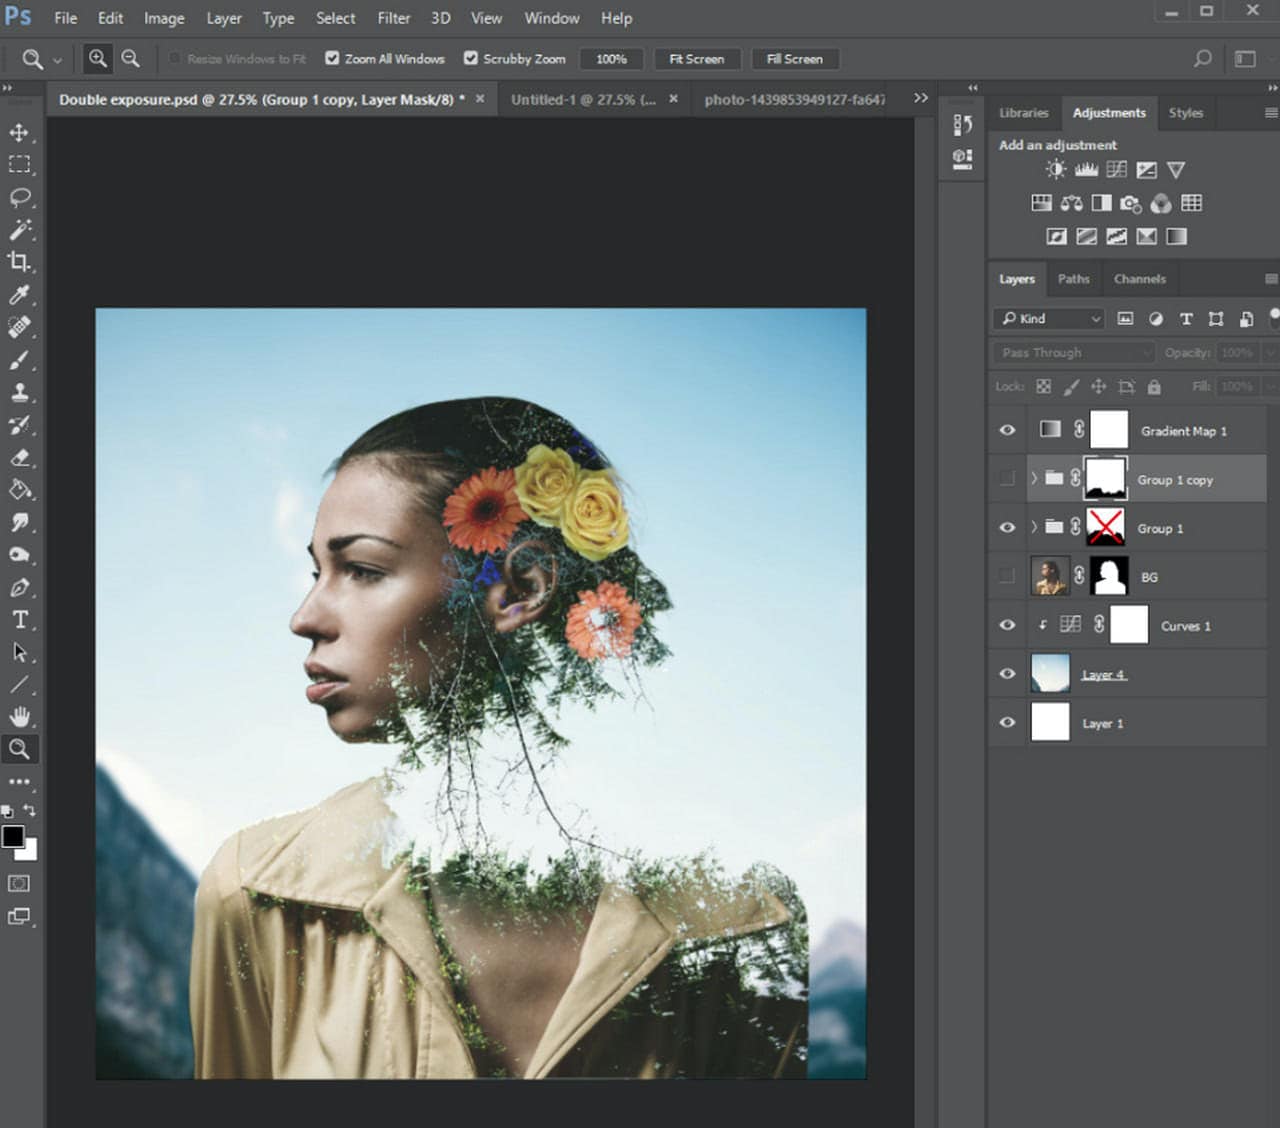
The Photoshop interface is user-friendly and packed with features. The main components include:
- Menu Bar: Located at the top, it provides access to different menus.
- Options Bar: Below the Menu Bar, it changes according to the selected tool.
- Tools Panel: Found on the left, it houses various tools for editing.
- Document Window: The central area where images are displayed and edited.
- Panels: On the right, panels like Layers, Colors, and Properties help in managing elements.
Here’s a summary of these components:
| Component | Description |
|---|---|
| Menu Bar | Access to different menus |
| Options Bar | Changes with selected tool |
| Tools Panel | Houses various tools |
| Document Window | Central area for images |
| Panels | Manage elements like layers and colors |
Essential Tools
Photoshop offers many tools for graphic design. Some essential tools include:
- Move Tool: Used to move objects within a document.
- Marquee Tool: Helps in selecting rectangular or elliptical areas.
- Lasso Tool: Allows freehand, polygonal, and magnetic selections.
- Magic Wand Tool: Selects areas based on color similarity.
- Crop Tool: Used to trim and straighten images.
- Brush Tool: For painting and retouching images.
- Clone Stamp Tool: Duplicates part of an image.
- Gradient Tool: Creates smooth color transitions.
- Text Tool: Adds and edits text in images.
These tools are critical for creating and editing graphics. Understanding their functions helps in achieving better results.
Creating your first project
Adobe Photoshop is a powerful tool for graphic design. Starting your first project can feel overwhelming. This guide will help you create your first project with ease.
Setting Up Canvas
Setting up your canvas is the first step in any Photoshop project. Follow these steps to get started:
- Open Adobe Photoshop.
- Click on File in the top menu.
- Select New from the dropdown menu.
You will see a new window pop up. This is where you set up your canvas. It is important to get this right. Your canvas size will affect your whole project. Here are some options you will see:
| Option | Description |
|---|---|
| Width | Sets the width of your canvas. |
| Height | Sets the height of your canvas. |
| Resolution | Sets the clarity of your image. 300 pixels/inch is good for print. |
After setting these options, click OK. Your canvas is now ready.
Choosing Dimensions
Choosing the right dimensions is crucial. It depends on your project. Here are some common dimensions:
- Web Design: 1920×1080 pixels.
- Print Design: 8.5×11 inches or 3000×2400 pixels.
- Social Media: 1080×1080 pixels for Instagram posts.
Think about your project’s purpose. Web designs need different dimensions than print designs. Social media posts have their own requirements too. Always choose dimensions that match your end goal.
Remember, you can always resize your canvas later. But starting with the right size saves time. It also makes your design process smoother.
Working with Layers
Adobe Photoshop is a powerful tool for graphic design. One key feature is working with layers. Layers allow you to create complex designs. They help manage different elements of your artwork. Understanding layers is essential for efficient design.
Layer Types
Photoshop offers various types of layers. Each type serves a different purpose. Here are the main types:
- Normal Layers: Basic layers for images, shapes, and text.
- Adjustment Layers: Used to apply color and tonal adjustments.
- Fill Layers: These layers are used for solid colors, gradients, and patterns.
- Smart Objects: Containers that hold image data from raster or vector images.
- Type Layers: Layers specifically for text elements.
Normal layers are the most common. They can contain images, shapes, or other elements. Adjustment layers are non-destructive. They adjust colors without changing the original image. Fill layers provide backgrounds or textures. Smart objects allow for non-destructive editing. Type layers handle text, making it easy to edit and style.
Layer Management
Managing layers is crucial in Photoshop. Here are some tips for better layer management:
- Use Layer Groups: Organize related layers into groups for easy management.
- Rename Layers: Give layers descriptive names to identify them quickly.
- Lock Layers: Prevent accidental changes by locking layers.
- Use Layer Masks: Apply masks to hide or reveal parts of a layer non-destructively.
- Adjust Layer Opacity: Control the transparency of layers for blending effects.
Layer groups keep your workspace tidy. Renaming layers helps identify them. Locking layers prevents mistakes. Layer masks offer flexibility. Adjusting opacity creates blending effects. Efficient layer management saves time and improves workflow.
Color theory in Design
Adobe Photoshop is a powerful tool for graphic design. One key aspect of design is understanding color theory. Colors can make or break a design. They convey emotions, create focus, and add aesthetic appeal. Learning the basics of color theory helps designers make effective choices. Let’s dive into the essentials of color theory in Photoshop.
Color Modes
Color modes define how colors are represented in digital and print designs. In Photoshop, RGB and CMYK are the most common color modes. RGB (Red, Green, Blue) is used for digital screens. It combines red, green, and blue light to create colors. This mode is ideal for web graphics, social media, and other digital content.
On the other hand, CMYK (Cyan, Magenta, Yellow, Black) is used for printing. It blends these four ink colors to produce a wide range of shades. This mode is perfect for brochures, business cards, and posters. Knowing when to use each mode is crucial for accurate color representation.
Here’s a quick comparison:
| Color Mode | Used For | Colors |
|---|---|---|
| RGB | Digital Screens | Red, Green, Blue |
| CMYK | Printing | Cyan, Magenta, Yellow, Black |
Grayscale is another mode that uses different shades of gray. It’s useful for black and white images. Bitmap mode is used for black and white line art. Each mode serves a unique purpose in design.
Choosing Palettes
Choosing the right color palette is essential for a cohesive design. A palette is a set of colors used in a project. Complementary colors are opposite each other on the color wheel. They create contrast and make designs pop. Examples include blue and orange or red and green.
Analogous colors are next to each other on the color wheel. They provide harmony and are pleasing to the eye. Examples are blue, teal, and green. Monochromatic palettes use variations of a single color. They create a clean, elegant look.
Here’s how to choose a palette:
- Determine the mood or emotion you want to convey.
- Use color tools like Adobe Color to explore combinations.
- Consider the audience and cultural meanings of colors.
- Test your palette on different devices and mediums.
Warm colors like red, yellow, and orange evoke energy and warmth. Cool colors like blue, green, and purple bring calm and relaxation. Mixing warm and cool tones can create balance in your design.
In summary, understanding color theory helps in making informed design choices. It enhances the visual impact of your work. Experiment with different palettes and modes to find what works best for your project.
Typography Essentials
Adobe Photoshop is a powerful tool for graphic design, especially when it comes to creating stunning typography. Typography is the art and technique of arranging type to make written language legible, readable, and appealing. Understanding the essentials of typography can make your designs more effective and visually engaging. In this blog post, we will explore the basics of font selection and text effects in Adobe Photoshop.
You May Also Like:
Font Selection
Choosing the right font is crucial for any design. Fonts can convey different emotions and messages. Here are some tips for selecting the perfect font:
- Understand the purpose: Know what your design needs to communicate.
- Readability: Ensure the text is easy to read.
- Match the tone: Choose a font that matches the mood of your design.
- Pairing fonts: Use complementary fonts for headers and body text.
Adobe Photoshop offers a wide range of fonts. You can find these in the font menu. Here are some popular categories:
| Category | Description |
|---|---|
| Serif | Classic and formal. Good for traditional designs. |
| Sans-serif | Modern and clean. Ideal for web and digital content. |
| Script | Elegant and decorative. Suitable for invitations and logos. |
| Display | Bold and impactful. Best for headlines. |
Remember, the right font can enhance your design and make your message clear. Experiment with different fonts to find the best fit for your project.
Text Effects
Text effects can add a unique touch to your typography. They can make your text stand out and grab attention. Here are some basic text effects you can use in Adobe Photoshop:
- Drop Shadow: Adds a shadow behind the text to create depth.
- Outer Glow: Creates a glowing effect around the text.
- Bevel and Emboss: Gives a 3D effect to the text.
- Gradient Overlay: Applies a gradient color effect to the text.
Applying these effects is simple. First, select the text layer in Photoshop. Then, go to the Layer Styles menu. You can adjust the settings for each effect to achieve the desired look.
Here is a quick guide to some common settings:
| Effect | Common Settings |
|---|---|
| Drop Shadow | Opacity, Distance, Spread, Size |
| Outer Glow | Blend Mode, Opacity, Size, Range |
| Bevel and Emboss | Depth, Size, Soften |
| Gradient Overlay | Blend Mode, Opacity, Gradient, Angle |
Experimenting with these effects can help you find the perfect style for your text. Don’t be afraid to try different combinations to see what works best.
Image Manipulation Techniques
Adobe Photoshop is a powerful tool for graphic design. One of its key features is image manipulation. With Photoshop, designers can change and enhance images in many ways. Two common techniques are cropping and resizing, and retouching images. These methods help in making pictures look perfect and professional.
Cropping and Resizing
Cropping and resizing are essential techniques in Photoshop. Cropping helps in removing unwanted parts of an image. It focuses on the main subject. This makes the image more appealing. Resizing changes the dimensions of an image. It helps in fitting the image to different spaces like websites or social media.
Here are the steps to crop an image:
- Select the Crop Tool from the toolbar.
- Drag the corners to adjust the crop area.
- Press Enter to crop the image.
Resizing can be done using the Image Size option. Follow these steps:
- Go to Image > Image Size.
- Enter the new dimensions in the Width and Height fields.
- Click OK to apply the new size.
Important tips for cropping and resizing:
| Tip | Description |
|---|---|
| Maintain Aspect Ratio | Keep the original proportions to avoid distortion. |
| Use High-Resolution Images | Start with high-quality images to ensure clarity after resizing. |
Retouching Images
Retouching images involves correcting imperfections. It enhances the overall look of the picture. Photoshop offers many tools for this purpose. The Healing Brush Tool is one of the most popular. It helps in removing blemishes and spots.
Steps to use the Healing Brush Tool:
- Select the Healing Brush Tool from the toolbar.
- Alt-click on a clean area to sample.
- Click and drag over the imperfection to correct it.
Another useful tool is the Clone Stamp Tool. It copies one part of an image to another area. This helps in covering larger imperfections.
Steps to use the Clone Stamp Tool:
- Select the Clone Stamp Tool from the toolbar.
- Alt-click to set the source point.
- Click and drag to apply the cloned area.
Additional retouching tips:
- Use layers to keep edits non-destructive.
- Zoom in for precise retouching.
- Adjust brush size for different areas.
Applying Effects
Adobe Photoshop is a powerful tool for graphic design. Applying effects can transform a simple image into something extraordinary. Effects like filters and blending modes add depth and creativity to your designs. Understanding these tools can elevate your graphic design projects.
Filters and Styles
Filters and styles in Adobe Photoshop provide various ways to enhance your images. Filters can change the appearance of an image in many ways. They can make an image look like a painting or add texture. Filters can also help correct flaws in photos.
Here are some common filters:
- Blur: Softens an image.
- Sharpen: Makes details more pronounced.
- Noise: Adds grain to an image.
- Distort: Warps the image in creative ways.
Styles are pre-set effects that can be applied to text or shapes. They can add shadows, glows, and other effects. Styles save time by applying multiple effects at once. You can also create custom styles to use on different projects.
Blending Modes
Blending modes in Photoshop change how layers interact with each other. They can create amazing effects by mixing colors and textures. Each blending mode has a different effect on the image. Here are some key blending modes:
| Blending Mode | Description |
|---|---|
| Multiply | Darkens the image by multiplying the base color by the blend color. |
| Screen | Lightens the image by screening the blend color over the base color. |
| Overlay | Combines multiply and screen modes. Adds contrast. |
| Soft Light | Gives a soft, diffused light effect. |
Experimenting with blending modes can lead to unique and creative results. It’s a simple way to add depth and interest to your designs. Combining blending modes with other effects can make your images stand out.
Exporting your work
Adobe Photoshop is a powerful tool for graphic design. It offers a wide range of features for creating stunning visuals. One crucial aspect of using Photoshop is exporting your work. Proper exporting ensures that your designs maintain quality and compatibility across different platforms. This guide covers essential aspects of exporting, including file formats and saving options.
File Formats
Choosing the right file format is vital for your design. Different formats serve different purposes. Here are some common file formats and their uses:
- JPEG: Ideal for web images. Compressed format, small file size.
- PNG: Best for images with transparency. Maintains quality, larger file size.
- GIF: Suitable for simple animations. Limited to 256 colors.
- TIFF: Preferred for printing. High quality, large file size.
- PSD: Photoshop’s native format. Keeps all layers and settings.
Each format has its pros and cons. JPEG is great for photos on websites. PNG is perfect for logos with transparent backgrounds. GIF is useful for small animations. TIFF is excellent for professional printing. PSD is essential for editing and preserving layers.
Saving Options
Photoshop provides several saving options to suit different needs. It’s important to understand these options:
- Save As: Allows you to save your work in different formats. Useful for creating multiple versions.
- Save for Web: Optimizes images for web use. Reduces file size without losing too much quality.
- Export As: Offers advanced exporting features. Lets you choose file formats, sizes, and more.
- Save a Copy: Makes a copy of your document. Keeps the original file untouched.
Using “Save As” helps in saving different versions of your design. “Save for Web” is great for optimizing images for websites. “Export As” gives you more control over your export settings. “Save a Copy” ensures that your original work remains intact.
By understanding file formats and saving options, you can ensure your work is exported correctly. This helps in maintaining quality and compatibility, whether for web use or printing.
Conclusion
Adobe Photoshop offers powerful tools for graphic design. It helps create stunning visuals. The software is versatile and suitable for beginners and experts. With practice, you can create professional designs. Its user-friendly interface makes learning easier. Start exploring its features today. Enhance your creativity and produce beautiful graphics. Remember, practice and patience are key. Happy designing!